The next thing I did was get a cover from the Cover Counts, because CD covers are square, not 6x9.
Most of the commentary I've seen on the Internet shows you how to do this with the free Mac product "Garageband." I downloaded the version on my iPad, but this is a toy that can't do audio mastering. All the PC versions used emulators and looked like virus/spam bait. No thanks. I decided to start my adventure using a great free recording and mastering tool called Audacity. You'll need the LAME encoder add-on to do MP3s.
Make sure you're recording in mono not stereo. You'll need to play around with it to get the right settings. I had to amplify the recording too much when I used 50, and 80 resulted in too many peaks exceeding Amazon's -3 db limit. I settled on 64 percent. Write down whatever you choose so that voice-overs later will be consistent. The way I work best is to record continuously for the whole chapter, which takes an average of half an hour. When reading, be consistent. Don't rush. If you make a mistake, don't get flustered. Take a breath or a drink, and start the phrase again. Save the raw material as an MP3. This is very important--save the originals. If you goof up and truncate a word or over-filter something, the original provides a way to recover without longer periods of re-dubbing.
I can comfortable do do five chapters in an afternoon. My record is nine, but doing alien voices will make my voice too rough.
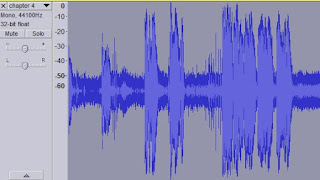
Now, the magic begins--transforming a hot mess into art. This is what the waveform looks like from the start of chapter 4. Note that I click the magnifying glass and enlarged the scale until I could see individual seconds on the time bar.
See the small bumps on the left? It's noise. Around my house, it's the refrigerator vibrating through the wall. I turn off the heat when I'm working, but the neighbor two houses down was playing with a skid steer. The new mic picks all that up! So the first step will be a high-pass filter somewhere in the 80-100 range. I did a spectral analysis and found that the bulk of the noise was near the 90 Hz area. I entered Effect/High Pass Filter and typed in the limit of 90 Hz with a roll-off of 48 db. If you have problems with whistling S sounds, you can use a Low Pass Filter at 3000 Hz with a gentle roll-off like 12db, but I don't apply this unless it's necessary. Amazon doesn't recommend low pass filters under 16000 H
 As you can see, this got rid of most of our problem. I was feeling pretty good until I read that Amazon demands nothing above the -60 db level. So let's shift scales to db and take a look.
Pull down on the black triangle next to the name of the track pick Waveform Db.
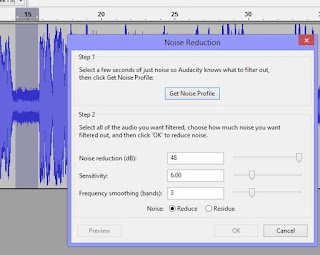
 Wow, that's hairy, and way over the requirements. Next, we adjust with Effects/Noise Reduction. Be careful with this tool because too little won't help and too much will make you sound like a robot. Highlight just the part between the words, and when prompted, click the Get Noise Profile button. Every chapter is a little different. Once you have the profile, hit CONTROL A to highlight the entire chapter. Then choose Effects/Noise Reduction again. This time, click the OK button to actually apply the filter.
The results are as smooth as pouring Nair in shampoo. The noise that's left falls into two main categories. The small ovals in this mode are my breathing. If you aren't sure, highlight this area and click the play button for this zone. With experience, you can spot these with ease, The only way to get rid of them is to select Generate/Silence for the highlighted area.
The tall narrow spikes are the smacking sound my lips make when I open my mouth.
During cleanup, I put in headphones and listen to the chapter. I wipe out the noise as I go, one screen at a time. As it plays, I listen for two types of mistake: the ones I repeated to get right, and the ones I didn't catch the first time through. The repeats are easy. I just highlight and delete the first of the duplicates. Usually, the other mistakes are me talking too fast, burying a word, or spiking the letter p. To address these, I listen to the highlighted words, and then replace them with silence. For the duration, instead of the default, I add at least a second to the duration to give me room to slow down and enunciate. I hit record and retry the patch phrase until I get it right. I listen and adjust the volume. Then, I remove extra space until the slow is just right.
 Third, I keep a eye on spacing. A comma should be half a second. Between sentences, it's 1 second. Between paragraphs, we allow 1.5 to 2 seconds depending on flow. At the start and end of the chapter, make sure we have 3 seconds.
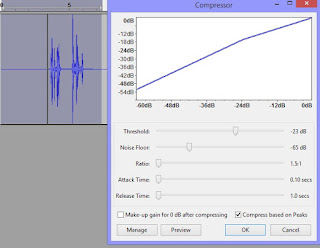
The next step is called compression, a dynamic filter that makes you sound like a radio pro. Amazon wants the RMS average of the volume to be in the -18 to -23 db range. Since I have a deep voice, I pick the -23 target with a floor of -65 db, ratio of 1.5 to 1, with a minimum attack and release. Play with these settings for your own best sound.
Lastly, these manipulations often push us beyond the upper limit of -3 db. To fix this, we pick Effect/Normalize, entering -3 db for the max. Things shrink a little. After each step, listen to several seconds to make sure you made things better.
Before submitting to Audible for approval, listen to everything yourself again. It wouldn't hurt to have a couple critical friends listen to the story for things you missed.
Because Facebook and this blog site don't support mp3 upload, I used the free trail on the WeVideo website to convert my sample into a video and post it. See the finished product!


